
Although they are not the primary focus of my digital reconstructions, people and often animals, are an important part of the rich detail that help to bring these scenes to life. But the process involved in making them is both tricky and time-consuming. So, just how do I achieve this when I have a small production budget and I don't have a team of artists to help?
In this article, I explain how I go about creating and adding figures to my scenes. I describe the production workflow, the challenges, considerations and limitations, and I discuss how my figures assist the visualisation and the few situations where they don't.
Modelling and rendering people and animals convincingly using computer 3D software presents an interesting set of problems and challenges for the digital reconstruction artist. It requires an extended skill set that embraces the study of anatomy and ergonomics, motion and movement.
There are other important factors too. For historical scenes, the artist must consider types of clothing and how fashions, as well as behavioural and social etiquette, developed through the ages.
Scenes interpreting militaria require an understanding of equipment, orders of battle and the handling of a range of different weaponry. Historic animal breeds, horsemanship and equestrianism are other corners of study in the course of doing my work.
It would be highly impractical for me to focus so much time and energy on the study of every one of these disciplines, so the best I can hope to do as an artist, is to at least have an awareness of them and approach each challenge by doing my homework properly. So, I regularly consult with historians or cultural advisers on these subjects in my endeavour to achieve historical accuracy.

My earliest reconstruction drawings were generally devoid of people - at best, they would be populated with nothing much more than a handful of hurriedly-drawn figures resembling L.S. Lowry's matchstick men.
At the point when I first began 3D modelling, an efficient way of modelling figures and animals didn’t exist, so the process was rather awkward and very, very laborious. It took a few years before the capabilities of 3D software advanced enough to make this task easier.
Digital sculpting tools such as ZBrush were developed, which offered a new way to construct incredibly detailed and realistic-looking models efficiently. The software quickly became a boon for character artists.
Interestingly, despite the efficiencies that these tools now afford the artist, I find that the production process is every bit as time-consuming as it used to be when I first started. I believe the reason for this is because the capabilities of these tools have advanced so much that it’s alarmingly easy to get carried away with the detail. This can create more problems for me because like so many other artists, I desire absolute perfection. Not having enough time to add in these details to satisfy my desire for high standards is an ongoing frustration that I must contend with.

I also need to consider that the level of detail I am putting into individual elements like figures may be far more than what the scene really requires. If I am only intending to render the figures out in tiny regions of my image, why do I go to so much trouble putting in all this detail you might ask? The answer to this is to do with how I deploy 3D models in my scenes.
A benefit to working with 3D models is that these can be moved around, not just within a single scene, but across different scenes too. Having a detailed model or asset that I can import into and repurpose in other projects is a huge advantage. So sometimes I find it is worth investing a bit of extra time on the modelling process to save time in a later project.
I put a lot of effort into creating templates which work well for generic-looking figure models like infantry. I sometimes prepare a range of alternative textures which I can switch between to add variation to my models.
A viewer’s attention will almost always be drawn to people in images – this is a natural human instinct. This can work to the artist’s advantage of course, but I have faced situations where to add figures to the artwork would distract too much attention from what the image is really trying to communicate.
There are times when it is just not practical to add figures to my scenes due to time limitations. I am primarily concentrating on architectural visualisation which consumes the greater share of the project time. So, I have to calculate at the beginning of a project if there is enough time to prepare figures as well. It is frustrating for me when the constraints of time and budget prevent me from adding these details, but it is just something that I have to accept from time to time.

My 3D models are as simple as I can get away with. They generally have a lower polygon count and so require less computational resources. This is necessary when importing the models into large and complex scenes that require a lot of physical memory (RAM).
For figures that appear in the foreground of my scenes or much closer to us in the view, I will usually need to add a bit more detail to the models. In these situations, I usually pay more attention to elements like hair and fur, clothing, fabrics, reflective and refractive materials, and subsurface scattering which is a technique used for creating more convincing-looking skin textures. The tool I use most often for basic modelling work is Blender 3D.
In the rare situations where figures become the central focus of the image, I usually have to re-think my approach to the artwork. Most of my effort will be spent on character modelling and will often require the use of both Blender and ZBrush 3D software. My preferred workflow is to use Blender to create a basic model which I will then import into ZBrush and sculpt in further detail from there.
Using ZBrush, I will gradually add layers of detail and complexity to the model. For my purposes, I only need only go as far as sculpting in the basic facial features, clothing and personal effects such as jewellery. I seldom need to craft in minute detail such as skin pores and hair strands etc. In going this far, we are entering the realm of high-definition modelling which isn’t really applicable for the type of work I am doing.
When I am happy with the model, my attention will turn to painting it. If time is short, and if the model is very simple, I can get away with painting the texture very liberally by just blocking out the model with simple fill colours. These are ‘baked’ into a single texture map from the material colour values I have assigned to different parts of the model such as regions of skin, hair, clothes, headgear etc.
Complex models require more delicate painting work and usually require the preparation of several texture maps which are used to create the illusion of high detail in a low-detail model. I will typically use a combination of six different texture maps. These are: Diffuse maps (for basic color information), Reflection and Metallic Maps (for glossy or shiny materials), Occlusion (for enhancing areas of contrast in the model and sometimes referred to as ‘Dirt Maps’), and a combination of Height and Normal Maps (which are used to create the illusion of detail in the model and are effective for showing folds and creases in clothing).
I use a program called Substance Painter which automates the process of baking these different maps. I use it for painting different materials and textures directly onto the 3D model and it creates some very convincing results.
I also do some painting work directly onto the texture maps using 2D imaging software such as Adobe Photoshop and Adobe Illustrator. I typically use these programs for the generation of seamless tile patterns and for other details like stitching, embroidery, hair and fur.
The model and the separate textures are all then re-imported into the Blender 3D software for the next step.
Re-topology is the process of taking a detailed model – usually one with a high-polygon count, and making a simpler or optimised version it. I will use this process to make a model with a much lower polycount so that it takes up less memory in my scene. I will then apply the textures that I baked from the high-polygon model to create the illusion of detail in the low-polygon model.
Normally, I don’t need to worry too much about re-topology because I am working with low-polygon models to start out with. It is also a very time-consuming process and so impractical to use in most of my work. I only perform this step for the scenes that have the very highest levels of detail.
Software used: Blender 3D.
I have the ability to set a range of different poses for my figures using Control Armatures or ‘Rigs’. The best way to describe these are to imagine a sort of simplified skeleton - a network of interlinked bones that I can manipulate in 3D to move the major limbs of the body around. It may include the extremities which might be individual fingers and toes, eyes and mouth if that level of detail is necessary.
The 3D model’s mesh is parented or mapped to this bone structure by using a process referred to as ‘Weight-Painting’. A certain amount of this process is automated by the 3D software but it only goes so far. I usually have to perform a lot of manual tweaking, especially for complex characters with clothing, so this process can be very fiddly and at times, it is incredibly frustrating.
The more advanced character rigs I use, have built-in constraints to limit the movement and rotation of individual bones so that they accurately reflect the natural limits of human and animal physiology. This is as advanced as my character rigs need to be for my purposes, but if I were to animate my figures, then an even greater number of controls and constraints would need to be designed into the rig. So, you can see how these projects can quickly grow in complexity.
Lighting plays an important part in how good my figures will look when rendered and this is particularly the case for indoor scenes. Good lighting can enhance the details in my models. Poor lighting can result in average detailing and this may mean that I will have wasted a lot of my effort putting the details into the model! So, yet more time is spent setting up lighting and evaluating it by running test renders. I may also perform a lot of tweaking to the materials settings in order to get everything looking just the way I want. It is a very slow process and it requires a lot of patience, but the results of this extra effort and attention to detail are usually rewarding.

Technology has advanced an incredibly long way in a very short space of time and so I think it is reasonable to predict that some of the processes I have described in this article will gradually become even easier.
Virtual Reality technology is now bringing exciting advances to the work of historical reconstruction. It is an area that I am very interested in and it will probably be the direction I hope to take next.
I welcome your comments and questions about this subject. I am particularly keen to hear from other reconstruction artists who may have a slightly different workflow or who face any specific challenges I haven’t mentioned here. Perhaps you avoid putting figures into your scenes altogether. If so, what are your reasons?
In this article, I explain how I go about creating and adding figures to my scenes. I describe the production workflow, the challenges, considerations and limitations, and I discuss how my figures assist the visualisation and the few situations where they don't.

Modelling and rendering people and animals convincingly using computer 3D software presents an interesting set of problems and challenges for the digital reconstruction artist. It requires an extended skill set that embraces the study of anatomy and ergonomics, motion and movement.
There are other important factors too. For historical scenes, the artist must consider types of clothing and how fashions, as well as behavioural and social etiquette, developed through the ages.
Scenes interpreting militaria require an understanding of equipment, orders of battle and the handling of a range of different weaponry. Historic animal breeds, horsemanship and equestrianism are other corners of study in the course of doing my work.
It would be highly impractical for me to focus so much time and energy on the study of every one of these disciplines, so the best I can hope to do as an artist, is to at least have an awareness of them and approach each challenge by doing my homework properly. So, I regularly consult with historians or cultural advisers on these subjects in my endeavour to achieve historical accuracy.

Figures depicted in my cutaway reconstruction of a Roman bath house.
Copyright © Historic Environment Scotland.
Copyright © Historic Environment Scotland.
My earliest reconstruction drawings were generally devoid of people - at best, they would be populated with nothing much more than a handful of hurriedly-drawn figures resembling L.S. Lowry's matchstick men.
At the point when I first began 3D modelling, an efficient way of modelling figures and animals didn’t exist, so the process was rather awkward and very, very laborious. It took a few years before the capabilities of 3D software advanced enough to make this task easier.

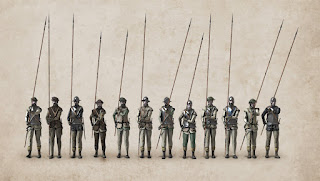
Pikemen. One of my first attempts to model figures for use in a reconstruction scene.
Interestingly, despite the efficiencies that these tools now afford the artist, I find that the production process is every bit as time-consuming as it used to be when I first started. I believe the reason for this is because the capabilities of these tools have advanced so much that it’s alarmingly easy to get carried away with the detail. This can create more problems for me because like so many other artists, I desire absolute perfection. Not having enough time to add in these details to satisfy my desire for high standards is an ongoing frustration that I must contend with.

To produce this army, I modelled about fourteen different figures together with a range of weapons such as bows, swords and shields. Each figure has four alternative texture maps that I can choose from to add further variation. The models are really basic, but they look great from a distance!
Considerations
The amount of detail I put into a scene is very much dependent on the time I have been granted for production - available budget is almost always the determining factor here.I also need to consider that the level of detail I am putting into individual elements like figures may be far more than what the scene really requires. If I am only intending to render the figures out in tiny regions of my image, why do I go to so much trouble putting in all this detail you might ask? The answer to this is to do with how I deploy 3D models in my scenes.
A benefit to working with 3D models is that these can be moved around, not just within a single scene, but across different scenes too. Having a detailed model or asset that I can import into and repurpose in other projects is a huge advantage. So sometimes I find it is worth investing a bit of extra time on the modelling process to save time in a later project.
I put a lot of effort into creating templates which work well for generic-looking figure models like infantry. I sometimes prepare a range of alternative textures which I can switch between to add variation to my models.

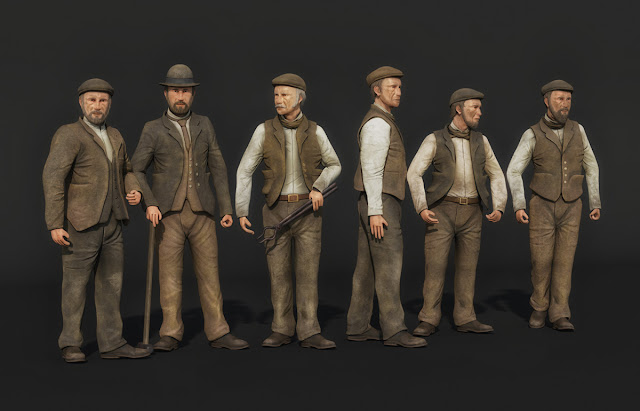
19th century mill-workers
The reason for excluding people in scenes
Interior spaces often need people present in them to help communicate a sense scale and to explain how the interior space or equipment might have been used. But there are situations where it is less favourable to include people in reconstruction scenes which are worth consideration. If the point of the reconstruction is to interpret architectural and decorative detail, then adding figures to the scene can sometimes draw too much attention away from this.A viewer’s attention will almost always be drawn to people in images – this is a natural human instinct. This can work to the artist’s advantage of course, but I have faced situations where to add figures to the artwork would distract too much attention from what the image is really trying to communicate.
There are times when it is just not practical to add figures to my scenes due to time limitations. I am primarily concentrating on architectural visualisation which consumes the greater share of the project time. So, I have to calculate at the beginning of a project if there is enough time to prepare figures as well. It is frustrating for me when the constraints of time and budget prevent me from adding these details, but it is just something that I have to accept from time to time.

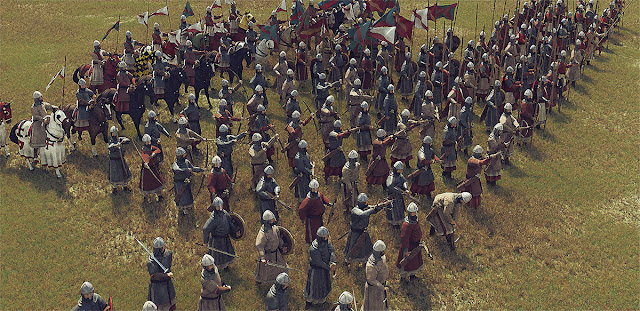
Renaissance army. I modelled nine different figures, then cloned these and simply adjusted the armature for each figure to give them all slightly different poses. The models have very simple painted textures and no more. It is all that is needed. The cloning is more obvious in this close-up example image but it is just enough to look convincing when viewed from a greater distance.
Typical production workflow
I refer to the small models which I create for my scenes as ‘assets’ or the ‘cast’ where I am referring to people. My typical workflow for the development and deployment of these assets in my scenes utilises as many as five different software applications. The process can be broken down into a series of individual tasks which I describe next.Preparation
Figures and other detailed assets are normally added to my scenes as a final step of the 3D modelling process once I have completed the modelling of buildings and the main architectural and decorative elements. The type of scene will determine how much detail I need to put into any figures. I will have researched as much as I can about clothing and personal equipment at the start of the project and for this, I usually assemble a library of reference images or I might make some preparatory sketch drawings.Modelling and sculpting characters
Software used: Blender, ZBrush.My 3D models are as simple as I can get away with. They generally have a lower polygon count and so require less computational resources. This is necessary when importing the models into large and complex scenes that require a lot of physical memory (RAM).
For figures that appear in the foreground of my scenes or much closer to us in the view, I will usually need to add a bit more detail to the models. In these situations, I usually pay more attention to elements like hair and fur, clothing, fabrics, reflective and refractive materials, and subsurface scattering which is a technique used for creating more convincing-looking skin textures. The tool I use most often for basic modelling work is Blender 3D.

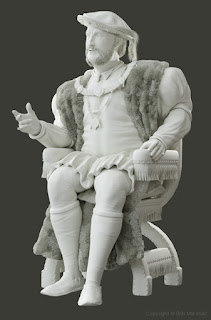
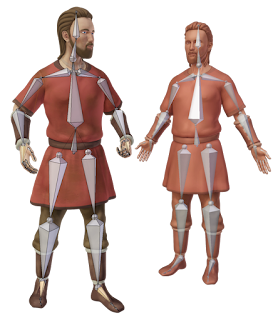
Untextured 3D model prior to painting
Using ZBrush, I will gradually add layers of detail and complexity to the model. For my purposes, I only need only go as far as sculpting in the basic facial features, clothing and personal effects such as jewellery. I seldom need to craft in minute detail such as skin pores and hair strands etc. In going this far, we are entering the realm of high-definition modelling which isn’t really applicable for the type of work I am doing.
Map baking and texture painting
Software used: Blender, ZBrush, Substance Painter, Adobe Photoshop, Adobe Illustrator.When I am happy with the model, my attention will turn to painting it. If time is short, and if the model is very simple, I can get away with painting the texture very liberally by just blocking out the model with simple fill colours. These are ‘baked’ into a single texture map from the material colour values I have assigned to different parts of the model such as regions of skin, hair, clothes, headgear etc.
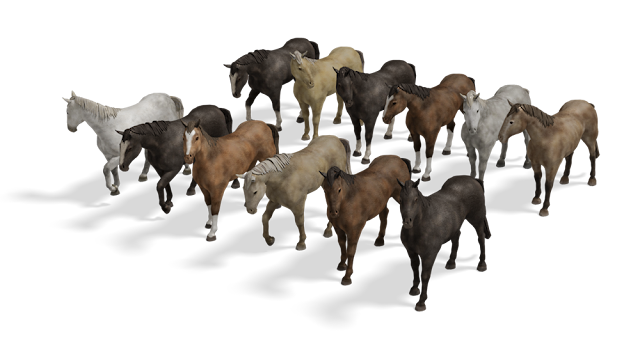
3D model horses
Complex models require more delicate painting work and usually require the preparation of several texture maps which are used to create the illusion of high detail in a low-detail model. I will typically use a combination of six different texture maps. These are: Diffuse maps (for basic color information), Reflection and Metallic Maps (for glossy or shiny materials), Occlusion (for enhancing areas of contrast in the model and sometimes referred to as ‘Dirt Maps’), and a combination of Height and Normal Maps (which are used to create the illusion of detail in the model and are effective for showing folds and creases in clothing).
I use a program called Substance Painter which automates the process of baking these different maps. I use it for painting different materials and textures directly onto the 3D model and it creates some very convincing results.
I also do some painting work directly onto the texture maps using 2D imaging software such as Adobe Photoshop and Adobe Illustrator. I typically use these programs for the generation of seamless tile patterns and for other details like stitching, embroidery, hair and fur.
The model and the separate textures are all then re-imported into the Blender 3D software for the next step.
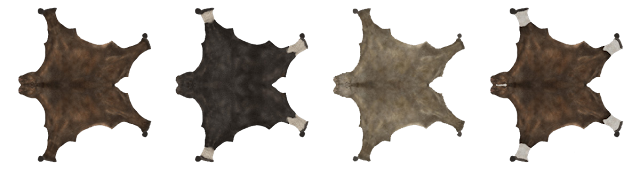
Alternate texture maps which are 'wrapped' around the 3D model horses
Re-topology
Software used: Blender, ZBrush.Re-topology is the process of taking a detailed model – usually one with a high-polygon count, and making a simpler or optimised version it. I will use this process to make a model with a much lower polycount so that it takes up less memory in my scene. I will then apply the textures that I baked from the high-polygon model to create the illusion of detail in the low-polygon model.
Normally, I don’t need to worry too much about re-topology because I am working with low-polygon models to start out with. It is also a very time-consuming process and so impractical to use in most of my work. I only perform this step for the scenes that have the very highest levels of detail.
Model rigging
Character armatures
I have the ability to set a range of different poses for my figures using Control Armatures or ‘Rigs’. The best way to describe these are to imagine a sort of simplified skeleton - a network of interlinked bones that I can manipulate in 3D to move the major limbs of the body around. It may include the extremities which might be individual fingers and toes, eyes and mouth if that level of detail is necessary.
The 3D model’s mesh is parented or mapped to this bone structure by using a process referred to as ‘Weight-Painting’. A certain amount of this process is automated by the 3D software but it only goes so far. I usually have to perform a lot of manual tweaking, especially for complex characters with clothing, so this process can be very fiddly and at times, it is incredibly frustrating.
The more advanced character rigs I use, have built-in constraints to limit the movement and rotation of individual bones so that they accurately reflect the natural limits of human and animal physiology. This is as advanced as my character rigs need to be for my purposes, but if I were to animate my figures, then an even greater number of controls and constraints would need to be designed into the rig. So, you can see how these projects can quickly grow in complexity.

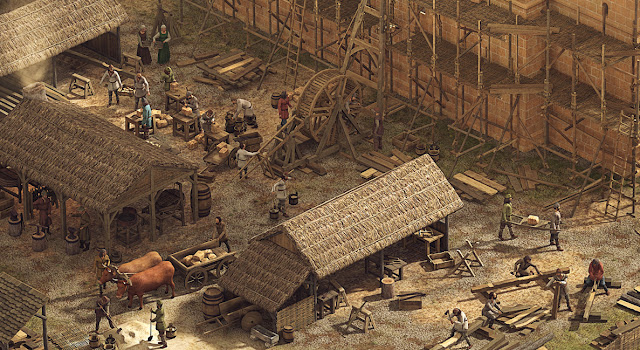
Simple figure models used to help communicate activity in one of my reconstructions. Copyright © Fife Coast and Countryside Trust 2015
Adding the figure models to the scene
The final step in the workflow is to import the individual models or ‘assets’ into my reconstruction scene. If the scene is populated with many models, then this process can also consume lots of time. Each model will need to be positioned in the scene carefully and it is here that some final tweaking is made to the character armatures such as adjusting the pose of various models to suit the scene.Lighting plays an important part in how good my figures will look when rendered and this is particularly the case for indoor scenes. Good lighting can enhance the details in my models. Poor lighting can result in average detailing and this may mean that I will have wasted a lot of my effort putting the details into the model! So, yet more time is spent setting up lighting and evaluating it by running test renders. I may also perform a lot of tweaking to the materials settings in order to get everything looking just the way I want. It is a very slow process and it requires a lot of patience, but the results of this extra effort and attention to detail are usually rewarding.

Left: Untextured 3D model. Right: Painted model rendered to test how lighting affects the model and its materials.
What does the future hold?
My models aren't refined to the same standards as found in modern games and simulations and they don't really need to be. However, I make it my goal to keep on improving these models in any way that I can. The extra bit of attention to detail I give them always makes a huge difference.Technology has advanced an incredibly long way in a very short space of time and so I think it is reasonable to predict that some of the processes I have described in this article will gradually become even easier.
Virtual Reality technology is now bringing exciting advances to the work of historical reconstruction. It is an area that I am very interested in and it will probably be the direction I hope to take next.
I welcome your comments and questions about this subject. I am particularly keen to hear from other reconstruction artists who may have a slightly different workflow or who face any specific challenges I haven’t mentioned here. Perhaps you avoid putting figures into your scenes altogether. If so, what are your reasons?


