Bass of Inverurie Reconstruction - Update

Making steady progress with my reconstruction of the Bass of Inverurie. I am still at the 3D modelling stage and trying different things out to see what works and what doesn't. This project is teaching me lots of new things, which is always a happy outcome, but there remain many unanswered questions. I may never find the answers I’m looking for, so the best I can do is to get as close as I can to satisfying the experts and then accompany my reconstruction with the usual cautionary note of conjecture!

Bass of Inverurie - Untextured 3D model (Third draft).

The project has reached the third draft stage and I feel that I am getting closer to what I think I can call a considered reconstruction, but there are a few elements that may yet change. Archaeology and heritage consultants, Peter Yeoman and Simon Forder (http://thecastleguy.co.uk), have kindly provided me with some useful feedback on my developing 3D model and I am extremely grateful to them for sharing their wisdom and expertise.

I am coming to terms with the understanding that the Bass was a much less substantial fortification than the one I had originally imagined. My first draft of the castle took on too much of the form of the classic Anglo-Norman motte-and-bailey timber castle of the type that rapidly began to dominate the lands of England and Wales following the Norman Conquest. In Scotland, the Norman influence on castle design is a much more gradual affair due to its resistance of the Norman advances over a much longer period. Fortifications here adopted the form of earlier strongholds which is understood to be the case at Inverurie. Exactly what type of fortification pre-dated the twelfth-century Inverurie castle is unknown, but its slopes were clearly scarped or landscaped to form the familiar motte and bailey earthworks we can still see to this day [Davidson, 1878].

Bass of Inverurie - Untextured 3D model (Third draft).

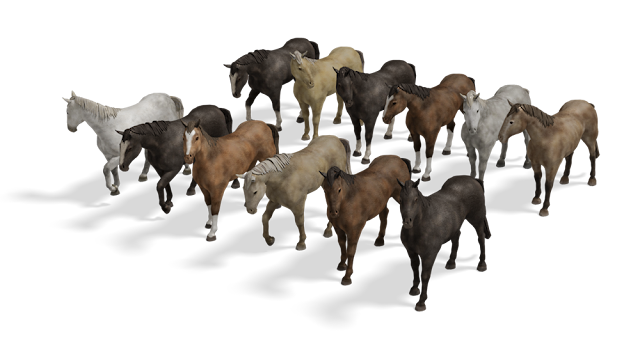
In this, my third draft of the 3D model, I continue to show an Anglo-Norman timber tower atop the motte but this is debatable. There is no evidence to suggest it was a timber tower and it could have been a much simpler type of structure, so I may yet revise this. While remembering the high status of its owner, the builders of the castle at Inverurie would have likely utilised what existing resources they could get hold of in order to construct it quickly. To use so much timber would have taken an army considerable time and engineering skill to erect, and such skills were probably in short supply this far north. Earl David and the retinue he travelled with likely only spent a few days or weeks of the year in residence here to avoid draining the resources of his lordships. For most of the time, he would have been kept occupied with his vast estates and interests in other parts of the Kingdom, not forgetting of course, his time spent in the Holy Lands in support of Richard I. So, the Bass was probably much less formal than the timber castles existent in the south of the land.

Bass of Inverurie - Untextured 3D model (Third draft).

I have changed the shape of the bailey and the ditch surrounding the castle in this third draft. The bailey is now about 15% larger, we believe because some of its area was excavated away during landscaping work carried out on the graveyard in the late nineteenth century. The bailey is now large enough to accommodate two buildings which fit the vague footprints we can see from this RCAHMS plan drawing - https://canmore.org.uk/collection/1333029. At the moment, my interpretation is that at least one of these two buildings was a long hall house. The purpose of the second building is unknown. It may have been another hall, stabling for horses, a workshop or kitchens. There is just about enough space for another building to the north of the bailey but this is pure conjecture.

I have reduced the quantity of timber in my third draft model – the tower is one storey shorter (I am considering whether to replace this with something different), the timber palisades are shorter and I have removed the raised wall-walks. The link between the upper and lower enclosures of the castle remains unexplained, so I have tried to interpret this as a low bridge with roped sides leading to stairs ascending the motte with a protective timber palisade at either side.

The other major change that I made to the model was to terminate the ditch on its northwest and northeast side. A late nineteenth-century OS map and an old photograph reveal what we think was the outward-facing side of an earthwork rampart. The area to the north side of the Bass (the motte) and Little Bass (the bailey) was probably terraced but without a defensive ditch. The river Urie ran alongside the castle here – itself a natural defensive feature. The ditch and rampart are now lost due to landscaping of the graveyard carried out at the end of the nineteenth century. An aerial photograph taken during the winter of 2016 shows the impact of devastating local floods on the area. The image demonstrates that this c19th landscaping work has caused more of the land to be exposed to flooding. Originally, the castle and its outer defensive ditch must have been just high enough above the reach of the river when these floods occurred in the past.

Bass of Inverurie - Untextured 3D model (Third draft).

My attention is now turning to adding detail to this model, rendering out some different perspective views, and then the time-consuming task of manual painting in Photoshop. I expect this work to take several weeks to complete.

I am abandoning plans to produce a fly-around animation, at least for the time-being. I had planned to make one for this project over the summer and export the model over to a game engine to make something interactive out of it, but I have simply run out of time.

History Scotland Magazine are intending to run a feature on the Bass of Inverurie in their winter edition due for publication in December 2017. It will feature my completed reconstruction and a short history of the castle and the Earls of Garioch written by historian and castle-enthusiast, David Weinczok. I will post more details over the coming months on my Facebook page.

Thank you all, for your interest and support with this project so far. I have had a lot of fun with this. Please feel free to drop me any questions or comments.

Bass of Inverurie - Untextured 3D model (Third draft).

Bass of Inverurie Reconstruction - Update

Conjectural Plan of the Medieval Burgh of Inverurie

I am working on the Bass of Inverurie reconstruction project more or less full time now. For the last few months, in between other jobs, I've been concentrating on the work of gathering information, making sketch drawings and trial 3D models of the castle. I've been busy reading quite a lot of material too - books, documents and archaeology surveys. A few weeks ago, I presented some of my first drafts to Aberdeenshire Council Archaeology Services who are very supportive of this project. Hopefully when this project is finished, my reconstructions will have a home on some new on-site interpretation panels as well as educational material.

I have now briefly turned my attention to the wider landscape and so I am busy creating some maps which pull together what little archaeological survey and documentary evidence there is. The maps are helping me to establish how the castle looked in situ with both the landscape and with the late twelfth or early thirteenth-century burgh. My research so far has revealed some interesting arguments about the location of the medieval burgh despite a lack of archaeological evidence for it! I am currently going with the more plausible of the arguments - that the burgh developed on the higher ground closer to where Inverurie's present high street is and out of reach of floods which, as we know very well, this area is vulnerable to. 

The Garioch Earls who built the Bass had a connection with a nearby moated castle known as Caskieben. The Bass of Inverurie’s constables were likely to be from the Leslie dynasty at Caskieben. This timber-palisaded castle was replaced in the thirteenth century by a stone-built castle later called Keith Hall when it passed to the powerful Keith family in 1662. 

I am spending some time in the library this week reading up a few documents which I am hoping will tell me a little more. Once I feel I have gathered enough information, I will progress with more high-detail 3D modelling. I am hoping to produce a series of static illustrations and if there is time and the resources to do so, perhaps an animated visualisation.


Above: some early stage models of the castle which I am using to test out various ideas factoring in the dimensions of the site and the surrounding landscape. Some of the elements pictured are likely to change as this project progresses.

For more information about this project please read my earlier post. http://www.bob-marshall.co.uk/2017/02/project-bass-bass-of-inverurie-visual.html

Adding Life to Digital Reconstructions

Although they are not the primary focus of my digital reconstructions, people and often animals, are an important part of the rich detail that help to bring these scenes to life. But the process involved in making them is both tricky and time-consuming. So, just how do I achieve this when I have a small production budget and I don't have a team of artists to help?

In this article, I explain how I go about creating and adding figures to my scenes. I describe the production workflow, the challenges, considerations and limitations, and I discuss how my figures assist the visualisation and the few situations where they don't.

Norman Army

Modelling and rendering people and animals convincingly using computer 3D software presents an interesting set of problems and challenges for the digital reconstruction artist. It requires an extended skill set that embraces the study of anatomy and ergonomics, motion and movement.

There are other important factors too. For historical scenes, the artist must consider types of clothing and how fashions, as well as behavioural and social etiquette, developed through the ages.

Scenes interpreting militaria require an understanding of equipment, orders of battle and the handling of a range of different weaponry. Historic animal breeds, horsemanship and equestrianism are other corners of study in the course of doing my work.

It would be highly impractical for me to focus so much time and energy on the study of every one of these disciplines, so the best I can hope to do as an artist, is to at least have an awareness of them and approach each challenge by doing my homework properly. So, I regularly consult with historians or cultural advisers on these subjects in my endeavour to achieve historical accuracy.

Roman Bath House reconstruction
Figures depicted in my cutaway reconstruction of a Roman bath house.
Copyright © Historic Environment Scotland.

My earliest reconstruction drawings were generally devoid of people - at best, they would be populated with nothing much more than a handful of hurriedly-drawn figures resembling L.S. Lowry's matchstick men.

At the point when I first began 3D modelling, an efficient way of modelling figures and animals didn’t exist, so the process was rather awkward and very, very laborious. It took a few years before the capabilities of 3D software advanced enough to make this task easier.

Pikemen
Pikemen. One of my first attempts to model figures for use in a reconstruction scene.
Digital sculpting tools such as ZBrush were developed, which offered a new way to construct incredibly detailed and realistic-looking models efficiently. The software quickly became a boon for character artists.

Interestingly, despite the efficiencies that these tools now afford the artist, I find that the production process is every bit as time-consuming as it used to be when I first started. I believe the reason for this is because the capabilities of these tools have advanced so much that it’s alarmingly easy to get carried away with the detail. This can create more problems for me because like so many other artists, I desire absolute perfection. Not having enough time to add in these details to satisfy my desire for high standards is an ongoing frustration that I must contend with.

Norman Army
To produce this army, I modelled about fourteen different figures together with a range of weapons such as bows, swords and shields. Each figure has four alternative texture maps that I can choose from to add further variation. The models are really basic, but they look great from a distance!

Considerations

The amount of detail I put into a scene is very much dependent on the time I have been granted for production - available budget is almost always the determining factor here.

I also need to consider that the level of detail I am putting into individual elements like figures may be far more than what the scene really requires. If I am only intending to render the figures out in tiny regions of my image, why do I go to so much trouble putting in all this detail you might ask? The answer to this is to do with how I deploy 3D models in my scenes.

A benefit to working with 3D models is that these can be moved around, not just within a single scene, but across different scenes too. Having a detailed model or asset that I can import into and repurpose in other projects is a huge advantage. So sometimes I find it is worth investing a bit of extra time on the modelling process to save time in a later project.

I put a lot of effort into creating templates which work well for generic-looking figure models like infantry. I sometimes prepare a range of alternative textures which I can switch between to add variation to my models.

19th century mill-workers


The reason for excluding people in scenes

Interior spaces often need people present in them to help communicate a sense scale and to explain how the interior space or equipment might have been used. But there are situations where it is less favourable to include people in reconstruction scenes which are worth consideration. If the point of the reconstruction is to interpret architectural and decorative detail, then adding figures to the scene can sometimes draw too much attention away from this.

A viewer’s attention will almost always be drawn to people in images – this is a natural human instinct. This can work to the artist’s advantage of course, but I have faced situations where to add figures to the artwork would distract too much attention from what the image is really trying to communicate.

There are times when it is just not practical to add figures to my scenes due to time limitations.  I am primarily concentrating on architectural visualisation which consumes the greater share of the project time. So, I have to calculate at the beginning of a project if there is enough time to prepare figures as well. It is frustrating for me when the constraints of time and budget prevent me from adding these details, but it is just something that I have to accept from time to time.

Renaissance army 3D models
Renaissance army. I modelled nine different figures, then cloned these and simply adjusted the armature for each figure to give them all slightly different poses. The models have very simple painted textures and no more. It is all that is needed. The cloning is more obvious in this close-up example image but it is just enough to look convincing when viewed from a greater distance.

Typical production workflow

I refer to the small models which I create for my scenes as ‘assets’ or the ‘cast’ where I am referring to people. My typical workflow for the development and deployment of these assets in my scenes utilises as many as five different software applications. The process can be broken down into a series of individual tasks which I describe next.

Preparation

Figures and other detailed assets are normally added to my scenes as a final step of the 3D modelling process once I have completed the modelling of buildings and the main architectural and decorative elements. The type of scene will determine how much detail I need to put into any figures. I will have researched as much as I can about clothing and personal equipment at the start of the project and for this, I usually assemble a library of reference images or I might make some preparatory sketch drawings.

Modelling and sculpting characters

Software used: Blender, ZBrush.

My 3D models are as simple as I can get away with. They generally have a lower polygon count and so require less computational resources. This is necessary when importing the models into large and complex scenes that require a lot of physical memory (RAM).

For figures that appear in the foreground of my scenes or much closer to us in the view, I will usually need to add a bit more detail to the models. In these situations, I usually pay more attention to elements like hair and fur, clothing, fabrics, reflective and refractive materials, and subsurface scattering which is a technique used for creating more convincing-looking skin textures. The tool I use most often for basic modelling work is Blender 3D.

Untextured 3D model prior to painting
In the rare situations where figures become the central focus of the image, I usually have to re-think my approach to the artwork. Most of my effort will be spent on character modelling and will often require the use of both Blender and ZBrush 3D software. My preferred workflow is to use Blender to create a basic model which I will then import into ZBrush and sculpt in further detail from there.

Using ZBrush, I will gradually add layers of detail and complexity to the model. For my purposes, I only need only go as far as sculpting in the basic facial features, clothing and personal effects such as jewellery. I seldom need to craft in minute detail such as skin pores and hair strands etc. In going this far, we are entering the realm of high-definition modelling which isn’t really applicable for the type of work I am doing.

Map baking and texture painting

Software used: Blender, ZBrush, Substance Painter, Adobe Photoshop, Adobe Illustrator.

When I am happy with the model, my attention will turn to painting it. If time is short, and if the model is very simple, I can get away with painting the texture very liberally by just blocking out the model with simple fill colours. These are ‘baked’ into a single texture map from the material colour values I have assigned to different parts of the model such as regions of skin, hair, clothes, headgear etc.
3D model horses
3D model horses

Complex models require more delicate painting work and usually require the preparation of several texture maps which are used to create the illusion of high detail in a low-detail model. I will typically use a combination of six different texture maps. These are: Diffuse maps (for basic color information), Reflection and Metallic Maps (for glossy or shiny materials), Occlusion (for enhancing areas of contrast in the model and sometimes referred to as ‘Dirt Maps’), and a combination of Height and Normal Maps (which are used to create the illusion of detail in the model and are effective for showing folds and creases in clothing).

I use a program called Substance Painter which automates the process of baking these different maps. I use it for painting different materials and textures directly onto the 3D model and it creates some very convincing results.

I also do some painting work directly onto the texture maps using 2D imaging software such as Adobe Photoshop and Adobe Illustrator. I typically use these programs for the generation of seamless tile patterns and for other details like stitching, embroidery, hair and fur.

The model and the separate textures are all then re-imported into the Blender 3D software for the next step.

Alternate texture maps for the horses
Alternate texture maps which are 'wrapped' around the 3D model horses

Re-topology

Software used: Blender, ZBrush.

Re-topology is the process of taking a detailed model – usually one with a high-polygon count, and making a simpler or optimised version it. I will use this process to make a model with a much lower polycount so that it takes up less memory in my scene. I will then apply the textures that I baked from the high-polygon model to create the illusion of detail in the low-polygon model.

Normally, I don’t need to worry too much about re-topology because I am working with low-polygon models to start out with. It is also a very time-consuming process and so impractical to use in most of my work. I only perform this step for the scenes that have the very highest levels of detail.

Model rigging

Character armatures
Character armatures
Software used: Blender 3D.

I have the ability to set a range of different poses for my figures using Control Armatures or ‘Rigs’. The best way to describe these are to imagine a sort of simplified skeleton - a network of interlinked bones that I can manipulate in 3D to move the major limbs of the body around. It may include the extremities which might be individual fingers and toes, eyes and mouth if that level of detail is necessary.

The 3D model’s mesh is parented or mapped to this bone structure by using a process referred to as ‘Weight-Painting’. A certain amount of this process is automated by the 3D software but it only goes so far. I usually have to perform a lot of manual tweaking, especially for complex characters with clothing, so this process can be very fiddly and at times, it is incredibly frustrating.

The more advanced character rigs I use, have built-in constraints to limit the movement and rotation of individual bones so that they accurately reflect the natural limits of human and animal physiology. This is as advanced as my character rigs need to be for my purposes, but if I were to animate my figures, then an even greater number of controls and constraints would need to be designed into the rig. So, you can see how these projects can quickly grow in complexity.


Building the church
Simple figure models used to help communicate activity in one of my reconstructions. Copyright © Fife Coast and Countryside Trust 2015

Adding the figure models to the scene

The final step in the workflow is to import the individual models or ‘assets’ into my reconstruction scene. If the scene is populated with many models, then this process can also consume lots of time. Each model will need to be positioned in the scene carefully and it is here that some final tweaking is made to the character armatures such as adjusting the pose of various models to suit the scene.

Lighting plays an important part in how good my figures will look when rendered and this is particularly the case for indoor scenes. Good lighting can enhance the details in my models. Poor lighting can result in average detailing and this may mean that I will have wasted a lot of my effort putting the details into the model! So, yet more time is spent setting up lighting and evaluating it by running test renders. I may also perform a lot of tweaking to the materials settings in order to get everything looking just the way I want. It is a very slow process and it requires a lot of patience, but the results of this extra effort and attention to detail are usually rewarding.

Untextured and textured, hand-painted 3D model
Left: Untextured 3D model. Right: Painted model rendered to test how lighting affects the model and its materials.

What does the future hold?

My models aren't refined to the same standards as found in modern games and simulations and they don't really need to be. However, I make it my goal to keep on improving these models in any way that I can. The extra bit of attention to detail I give them always makes a huge difference.

Technology has advanced an incredibly long way in a very short space of time and so I think it is reasonable to predict that some of the processes I have described in this article will gradually become even easier.

Virtual Reality technology is now bringing exciting advances to the work of historical reconstruction. It is an area that I am very interested in and it will probably be the direction I hope to take next.


I welcome your comments and questions about this subject. I am particularly keen to hear from other reconstruction artists who may have a slightly different workflow or who face any specific challenges I haven’t mentioned here. Perhaps you avoid putting figures into your scenes altogether. If so, what are your reasons?

The Bass of Inverurie Visual Reconstruction Project

The Bass of Inverurie is to be the focus of one of my forthcoming digital reconstructions. This is a personal project which I am aiming to contribute to from time to time in-between other jobs but I hope to post my progress as I go. I welcome any help or advice, so please read on for more information and I would be grateful if you could share this with anyone you know who might be interested. At the end of this project, I hope to make all of this work freely available to the wider community for educational use as part of Scotland’s Year of History, Heritage and Archaeology 2017.

One of several Pictish stones lie nearby to the motte

Located at the meeting point of the rivers Don and Urie, at Inverurie in Aberdeenshire, are the striking remains of a late 12th century Motte and Bailey Castle known as the Bass of Inverurie. It is a remarkable structure, for there are virtually none of these earlier period castles left in Scotland that are as well-preserved. Motte and bailey castles were once common right across the land, some 300 have been identified across Scotland[1], but most disappeared completely or were re-developed as the need for more substantial stone-built castles replaced them.

I was born and brought up in rural Aberdeenshire, and I must have driven or cycled past the Bass of Inverurie on countless occasions. For a long time, I remained blissfully ignorant of its significance and I simply regarded it as a rather strange-looking mound in the middle of a cemetery. When I was a young lad, castles to me were grand and evocative places like Crathes, Craigievar, Fyvie, and Dunottar. Then after discovering a few books, I was amazed to learn that the mound I had so readily overlooked was actually once a very important castle and it is one that has captured my imagination and interest ever since.

View of the Bass of Inverurie from the West.
The 'Bass' was a very important fortress in its time. David, Earl of Huntingdon, who built it in the 1100s, was a member of the Royal Family - he being the brother of Malcolm IV, King of Scotland and the younger grandson of King David I of Scotland. An heir to the Scottish throne until the end of the 12th century, he owned rich estates in the East Midlands of England including Fotheringhay Castle.

The Bass was used as a base by Robert the Bruce during the Battle of Barra in May 1308. In the battle, Bruce defeated his arch rival John Comyn, 3rd Earl of Buchan during the period of the Wars of Scottish Independence. Decorated pottery found at the site suggests that the castle was in use until the 14th century. It was never replaced with a stone castle. At this time Bruce's policy was to slight many Scottish Castles to prevent them falling into enemy hands. We can probably surmise that the Bass was one such victim, as the castle disappears from history on or after this point.

The Bailey - view from the West.
The castle comprises of two distinct man-made[2] earthworks or mounds - the principle mound (the motte) rises to a height of approximately 15m and the second mound (the bailey) known as the Little Bass is roughly a third of the height of the motte. A high-sided timber palisade would have protected a two or three-storey timber-built tower at the summit of the motte. A series of steep wooden steps led up one side of this providing access to it from the lower mound or the bailey, traces of which were found in the late nineteenth century. A cluster of simple timber structures - most likely accommodation, kitchens, stores, stabling and workshops occupied the site of the bailey. A defensive ditch would have been excavated around the base of both mounds and the entrance to the bailey was reached via a gated drawbridge to the east side. To reach its entrance, one would have had to have walked right around the South side of the castle making it look very impressive indeed. But that probably had as much to do with defence since it gave the castle's inhabitants more time to observe approaching threats.

The Bailey as seen from the top of the motte.

The reconstruction

I am attempting to produce a series of reconstruction visuals of the Bass of Inverurie using a blend of 3D models, land-based and aerial photography. I would like to produce an animated reconstruction if enough people are interested to see this, and I will try and upload a model to my Sketchfab page at the end. This is a personal project which I am doing as part of my interest in Scotland's earlier period of castle-building and I am using it to pilot some new visual techniques.

I will probably attempt to visualise the castle at some point in its later life - perhaps around the time it was used as a base by Robert the Bruce, by which time the castle will have existed for around a hundred years. There are no records to describe what the castle actually looked like so my reconstruction will have to be speculative. I will draw on information and influences from what we know about other motte and bailey castles from other corners of Britain in this same period. I welcome suggestions and feedback from anyone who is interested in my project, whether you are from an academic background or if you simply share an interest in Scottish history. Please get in touch by email, leave your comments on this blog, or over on my Facebook page. And please do share this page with anyone who you think might be interested.

I will be working on this periodically in between other projects and I will update this page with a few trial sketches, 3D models and other visuals as I go. My hope is to finish this project by the end of 2017 but it will depend on how busy I get with other work and how much help I can get from various sources. At the end of this project, my aim is to make as much of the work as I can, freely available to the wider community for educational use.

Bob

View of the motte from the South

Footnotes

[1] Tabraham, C (2005) [1997]. Scotland's Castles. London: BT Batsford. ISBN 0 7134 8943 X.
[2] The bass is a natural mound which was converted to a motte by the scarping of its sides and the excavation of a ditch around it which is now infilled. Source: Aberdeenshire Council Archaeology Services.